Citrus Flavours

Citrus Flavours
Photo by Scott Bauer

Search This Blog

Background of Blog

This blog has been designed to enlighten the world to sweet and savoury cusine. Personally, my favourite ingredient in cooking is citrus fruits, particually lemons, so I will try to inspire your inner chef to share the interesting flavour of lemons in the most indulgent cupcakes, muffins, cakes, slices, cookies and of course savoury dishes. My collection of recipes can be applied to any situation; formal or informal, in any case they are delicious and will interest your guests! Enjoy preparing and sharing the following recipes for what will be a memorable gathering with friends and family for any occassion.

Tuesday, February 22, 2011

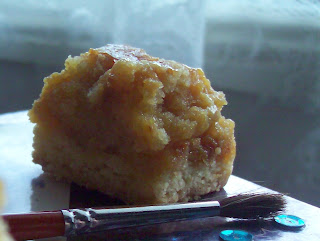
Butterscotch Squares

Recipe from 100 Favourite Muffins and Slices by Simon and Alison Holst
Images by Yasmin

This is a sweet, caramel flavoured slice that is very addictive. It tastes fantastic plain and in small slices as a snack. I make this slice often and everyone enjoys its sweet taste.


Ingredients:
Base and Topping:
  • 125g butter
  • 1/2 cup sugar
  • 1 egg
  • 1 tsp vanilla flavouring
  • 1 cup SR flour
  • 1 cup flour
Filling:
  • 100g butter
  • 2 tblsp golden syrup
  • 400g sweetened condensed milk
Method:
Heat oven to 180'C fan-forced. For base, cut butter into pieces and melt. Take off heat and beat in sugar, egg, vanilla flavouring until evenly mixed. Stir in the flours until mixture is crumbly, then squeeze into a ball. Break 3/4 of the dough into bits and spread evenly in the pan. Put the rest in the fridge.

For filling, melt butter in a pot. Add in syrup and stir. Add condensed milk, mix well, then pour the filling over the unbaked mixture in the tin.

For topping, grate the cold remaining dough on tip of the filling. Bake for 30-45 minutes. Cool on rack for 2 hours. Cut into slices. Store in the fridge (sometimes it is best to refridgerate first and then cut into slices).

Saturday, February 19, 2011

Sticky Toffee Pudding

Recipe from I Love Sugar
Images by Yasmin

(serves 6-8)
I have always loved caramel flavoured treats and desserts, and recently at a friends house I was reminded of one of my favourites; Sticky Date Pudding. This dessert was so delicious that I promised myself that I would make it again soon. So when the occassion arose, I jumped at the chance to offer this twist to a classic; Sticky Toffee Pudding. Although it almost turned out as a disaster because I forgot to fold in the flour, this dessert will serve everybody's cravings for sweet and scrumptious. I served this cake as a welcome home dessert for my sister, Alana, who has been in Japan for the past three months and is homesick for my cooking! What separates this dessert from the original is that it has more dried fruit, not as many basic cake ingredients, and a new and improved sauce, Sticky Toffee Sauce. I loved this dessert and I know you will too! Did you know that dates are old fruits from the holy land that grow on Date Palms?

Ingredients:
Pudding:
  • 75g sultanas
  • 150g stoned dates, chopped
  • 1 tsp bi-carb soda
  • 25g butter
  • 200g soft light brown sugar
  • 2 eggs
  • 200g SR flour
Sticky Toffee Sauce:
  • 25g butter
  • 17ml double cream
  • 200g soft light brown sugar

Method:
Preheat oven to 180'C fan-forced. Grease a 20cm round cake tin.

To make pudding, put the sultanas, dates and bi-carb soda into a heatproof bowl. Cover with boiling water and leave to soak. Put the butter into a separate bowl, add the sugar and mix well. Beat in the eggs, then fold in the flour. Drain the soaked fruit, add to the bowl and mix.

Spoon the mixture evenly into the prepared cake tin. Bake for 25-35 minutes, or until skewer inserted comes out clean. Remove from oven and turn out onto wired racks to cool if not serving immediately.

About five minutes before the end of the cooking time, make the sauce. Melt the butter in a saucepan over a medium heat. Stir in the cream and sugar and bring to the boil, stirring constantly. Reduce the heat and simmer for 5 minutes.

Turn out the pudding onto a serving plate and either pour over the sauce or place in a jug and allow guests to serve themselves. Serve with whipped cream or unwhiped cream drizzled on or ice-cream or custard (optional).

Saturday, February 12, 2011

Orange and Lime Cheesecake

Recipe from Favourite Muffins, Biscuits, Cakes and Slices
Image by Yasmin

(Serves 8)
I am very proud of my efforts with this cheesecake because it is the first cheesecake I have ever made. During  the process I faced a few speed bumps, but all turned out well in the end. So you don't worry while baking this cheesecake I shall tell you my hicups and how to over come them. Firstly, when you press the biscuit base into the removable base make sure that it climbs a little up the sides of the tin - otherwise once you have poured in the cheesecake mixture it will start leeking out the sides!!! If this does begin to happen - as it did with me - place the tin on to a baking tray and then into the oven. In this way it will have something pressing on the base so the leeking stops. Secondly, don't worry if the mixture seems really runny once everything has been added, if you are concerned add a little bit more cream cheese, condensed milk and cream. Once it has cooked it will set and become firm. Thirdly, after folding in the whipped cream the cheesecake mixture seems very lumpy, when it doesn't appear lumpy in the photo provided. Once again don't freak out, it is meant to look like that at this stage. While it is cooking the cream seems to melt, spread out and blend in with the rest of the mixture. Lastly, if the cheesecake starts to get dark spots on the top where it has overcooked, and the rest is not yet firm, simply rotate the tin in the oven and try to forget about it!!! Keep in mind that you can't get it perfect first time everytime, even if it doesn't look exactly as it does in the picture, remember it will still taste fantastic all the same! Good Luck!


Ingredients:
For Base:
  • 1 cup plain sweet biscuits, crushed
  • 1/3 cup butter, melted
For Filling:
  • 3/4 cup cream cheese, softened
  • 2 tblsp brown sugar
  • 1 1/2 tsp finely grated orange zest
  • 1 1/2 tsp finely grated lime zest
  • 3 tsps orange juice
  • 3 tsps lime juice
  • 1 egg, lightly beaten
  • 1/2 cup sweetened condensed milk
  • 2 tblsp double cream, whipped

  • desicated coconut, toasted, to decorate
  • whipped cream, to serve 

Method:
For base, place biscuits and butter in a bowl and mix to combine. Press the bisuit mixture over the base and up the sides of the well-greased 23cm flan tin with a removable base. Bake for 5 - 8 minutes at 180'C fan-forced, then cool.

For filling, place the cream cheese, sugar, orange and lime zests and juices in a bowl and beat until creamy (may start to get lumpy here due to cream cheese). Beat in the egg, then mix in the condensed milk and fold in the cream (large lumps will form). Pour the filling into the prepared biscuit case and bake for 25 - 30 minutes or unti ljust firm. Turn the oven off and cool the cheesecake in the oven with the door ajar. Chill before serving., Serve decorated with the toasted coconut and cream.

Friday, February 11, 2011

Orange and Blueberry Muffins

Recipe from Favourite Muffins, Slices and Cakes
Images by Yasmin
(makes approx. 12-16)

The smell of this muffin in the oven began a frenzy around my house. Everyone was asking what I was baking, but due to the sweet sent on oranges, they had already half guessed; Orange and Blueberry Muffins. Only recently have I begun to expand my selection of recipes to muffins. This was because my mother had always warned me when we ate coffee and cake together in the shops that the selection of cakes and muffins can often be dry; something she couldn't stand. For this reason I tended to stray away from muffins because I knew she didn't particularly like them. Now that I am a more confident cook I am happy to spend the whole weekend baking muffins, cakes and slices to my hearts content and not worry about over-cooking. I really enjoyed this muffin and am soon going to make a classic dessert in muffin form; Sticky Date Muffins! My stomach is already rumbling!!!


Ingredients:
  • 1 orange
  • 1/2 cup orange juice
  • 125g butter, chopped
  • 1 egg
  • 185g plain flour
  • 170g caster sugar
  • 1 tsp bi-carb soda
  • 1 tsp baking powder
  • 1/4 tsp salt
  • 125g frozen or fresh berries

Method:
Preheat oven to 200'C fan-forced. Peel the rind from the orange, remove all pith, and cut the rind into small pieces. Remove membrane and seeds from orange and cut the orange into segments. Place orange rind and segments, orange juice, butter and egg in a food processor and process until well combined (mixture will curdle). Transfer mixture to a large bowl. Sift together flour, sugar, bi-crab soda, baking powder and salt, add to orange mixture and lightly mix. Batter should be lumpy. Fold in the berries. Divide batter between 12-16 greased muffin tin, filling 2/3 full. Bake for 18-20 minutes at 180'C fan-forced until cooked and golden. Cool on wire racks. Serve.

Saturday, February 5, 2011

Coconut Cake with Passionfruit Sauce

Recipe from Erica
Images by Yasmin

This is a beautiful little tea cake to share among friends. I first ate this cake at a family friends home for morning tea a few years ago and have been baking it ever since. It is just so simple and sweet. I love the different textures of the coconut, passionfruit pulp and soft sponge cake, all combining perfectly in your mouth as you take the first bite. The mixture of textures, flavours and the hot sauce, balances this cake perfectly.


Ingredients:
Cake:
  • 170g raw sugar
  • 120g butter
  • 150g SR flour
  • 50g desiccated coconut
  • 1 egg
  • 60g milk
  • 60g coconut milk
  • whipped cream, to serve (optional)
Syrup:
  • 170g tin passionfruit pulp
  • 50g water
  • 60g sugar

Method:
Preheat oven 180'C fan forced. Prepare square cake tin. Place sugar in food processor. Pulverise. In seperate bowl, melt butter. Add to sugar. Add remaining ingredients. Mix well. Pour into prepared tin. bake for 30 minutes or until golden brown on top. Cool for 10 minutes in tin. Put on rack to cool completely. For Syrup recipe visit the Icings and Sauces Page on this blog. Serve with cream and syrup.

Jolly Cake

Recipe from Cake Bible
Images by Yasmin

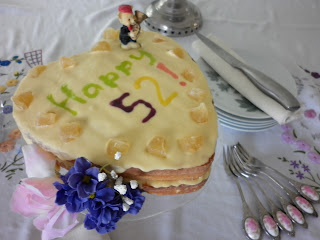
This cake is very festive. It will suit all special occasions; birthdays, parties, Easter and especially Valentines Day. With knowledge of this upcoming event, and my Mum's birthday, I prepared  this cake in the shape of a love heart and decorated it accordingly. Depending on this situation depends on the decorations and design, be as creative as possible! Personally, I love layered cakes and sweet flavours. In this cake the filling is not the usual cream and strawberries combination, but instead is honey and lemon icing - a beautiful combination. This 'jolly' cake is best shared in the happy accompaniment of friends and family, in order to give life to it's name.


Ingredients:
Base:
  • 175g butter
  • 175g brown sugar
  • grated zest of 1 lemon
  • 3 eggs, beaten
  • 175g SR flour, sifted
  • 1/3 cup whisky
Filling:
  • 50g butter
  • 175g icing sugar
  • 1 tblsp lemon juice
  • 2 tblsp thick honey (alternatively you can use golden syrup)

Method:
Preheat oven 190'C fan forced. Prepare two cake shallow cake tins for layering. Cream butter, sugar, lemon zest. Gradually beat in eggs, keeping mixture stiff. Fold in half the sifted flour. Add whisky and the remaining flour. Pour evenly into the 2 prepared tins. Bake for 20 - 25 minutes. Allow to cool on rack.

For lemon butter cream filling, beat all ingredients into a bowl. Sandwich cakes together with half the filling. Spread left over filling on top of the cake. Decorate accordingly. Serve.

Stir Fry with Fried Rice

Recipe by Louise and Yasmin
Images by Yasmin

Usually I am not fond of Stir Fry for dinner as it is a frequent dish at my house for dinner; however, this time was different and special because it was my first, actually solo made, dinner! I was very proud of myself. I have made many dinners before - mostly spagbol or pasties - but someone has always been hovering around to give me some pointers or tell me what to do next. As a result, this is a very basic, but delicious, version of Stir Fry made our family way. I hope you all enjoy it!


Ingredients:
  • 3 tblsp olive oil
  • 1tsp chili paste
  • 1 tsp garlic paste
  • steak, cut into small chunks
  • variety of vegetables (carrot, capsicum, cucumber, bok choy etc), cut into small chunks, soaked in water, drained
  • 2 tblsp fish sauce, extra for taste if needed
  • 3 tblsp oyster sauce
  • 3 - 4 tblsp water
  • Fried Rice, to serve (for recipe see Fried Rice post)

Method:
Heat 2 tblsp oil in a frying pan. Add chili paste, garlic paste and steak to pan and stir (watch out for spitting oil). Lightly brown meat until just turning brown (still some pink on the meat). Remove from pan and set aside on a plate. Wipe pan with paper towel. Heat pan again with 1 tblsp of oil. Add drained vegetables. Stir fry vegetables (keep tossing the vegetables) with fish sauce and oyster sauce until the vegetables are just soft. Return meat to pan (it usually is almost overflowing at this point!). Add water. Stir fry with lid on until vegetables are soft and meat is no longer pink. Add extra fish sauce to taste if needed. Serve with hot fried rice.

Tuesday, February 1, 2011

Egg Decorating

Everybody tries to 'jazz up' ones meal and make it look appealing, but has anyone thought of decorating it for entertainment? At school, egg decorating and cake decorating (as you can see on the 'designer cakes for parties' page) is a fun way to be creative with food. Once a year our school holds a day for us to be creative and have fun, it is called 'Cultural Festival'. On this day we all enter different competitions, such as singing, playing an instrument, egg decorating, cake decorating, comedy, pavement art and the list continues. Below are some of my sister's and my previous entries for the egg decorating competition, some of them even won places! (I shall post the others once the photos have been relocated!) 


To decorate an egg you can cheat and hard boil it, or follow the traditional method of 'blowing' the egg. This means you use a skewer to gently make a hole at both ends of the egg, then you blow in one end (really hard) to make the yolk and whites come out the other (make the bottom hole bigger). This takes some time and a lot of effort. I guarantee once the egg is hollow, you will be light headed!! Then sit it in an egg cup to drain and dry. Once dry, decorate accordingly to your theme. Then try and think of a name that can use egg- instead of ex- such as egg-cellent. This way it is much more entertaining! Enjoy!

'Egg-austed'
(notice the egg-person sleeping upstairs while the party is happening downstairs!)
By Yasmin


'Cultural Diversity'
By Camilla