Citrus Flavours

Citrus Flavours
Photo by Scott Bauer

Search This Blog

Background of Blog

This blog has been designed to enlighten the world to sweet and savoury cusine. Personally, my favourite ingredient in cooking is citrus fruits, particually lemons, so I will try to inspire your inner chef to share the interesting flavour of lemons in the most indulgent cupcakes, muffins, cakes, slices, cookies and of course savoury dishes. My collection of recipes can be applied to any situation; formal or informal, in any case they are delicious and will interest your guests! Enjoy preparing and sharing the following recipes for what will be a memorable gathering with friends and family for any occassion.
Showing posts with label dessert. Show all posts

Tuesday, January 10, 2012

Chocolate Cherry Ice-cream Cake

Recipe from Women's Weekly The Barbecue Cookbook
Images by Yasmin

This is a beautiful idea; two wonderful creations combined - ice-cream and cake! Ice-cream cake is fun to make with a few people as it brings you together and enables you to relax as you work. As a result, this is how the image below came to be made. Because there are chocolate and cherries in this recipe, I naturally don't like it; however, I am under the impression that my friends and family LOVE it so I'm sure you will too! Boxing Day was also when this dish was served, alongside the Orange Creme Caramel dessert. Good combination! Unfortunately, as you can see in the image below, the loveheart tin chosen to make this dessert in wasn't deep enough, so we could only stack two layers into the cake; serving the third as a scoop of ice-cream.


Ingredients:
  • 2L vanilla ice-cream
  • 90g dark cooking chocolate
  • 1/2 cup thickened cream
  • 2 tblsp cocoa
  • 2 tblsp red glace cherries, chopped
  • 1/2 bag of honeycomb chocolates
Method:
Heat chocolate and cream over low heat until chocolate is melted, stir in sifted cocoa, cool to room temperature. Whip cream until soft peaks form.

Soften Ice-cream tube slightly, divide between three bowls. Mix glace cherries into ice-cream in one bowl. Spoon ice-cream into cake tin. Freeze while preparing the next layer.

Gently fold chocolate cream into the second bowl of vanilla ice-cream. Spoon chocolate ice-cream over first layer.

For third layer, half or quater the chocolate honeycomb pieces. Mix into the last bowl of ice-cream. Spoon over chocolate ice-cream (if you have room!!!). Freeze several hours or overnight.

Sunday, January 8, 2012

Orange Creme Caramel

Recipe from Women's Weekly Barbecue Cookbook
Images by Amanda and Yasmin

This is a yummy dessert with an interesting texture. It is not as hard as a cheesecake but not as soft as custard. This dessert has double points for me because it is a citrus flavoured dish; however, it looses points because it is a very subtle flavour of citrus orange - and I love a strong citrus flavour. However, if you have a pallet similar to my sisters, you will love the infusion of orange you taste with each bite. It seems as though you might taste the orange but then as you grasp for the flavour it slips out of reach until another bite is taken. I served this dessert on Boxing Day and everybody loved it.


Ingredients:
  • 3/4 cup sugar
  • 1/4 lemon juice
  • 1/2 cup water
  • 4 eggs
  • 1/3 cup sugar, extra
  • 300ml jar thickened cream
  • 1 1/2 cups milk
  • 2 tsp grated orange rind

Method:
Combine sugar, lemon juice and water in pan, stir over low heat without boiling until sugar is dissolved. Bring to the boil, do not stir. Boil rapidly, uncovered, until syrup turns golden brown, about 5 minutes. Pour the syrup into an 18cm round cake tin.

Lightly beat eggs and extra sugar together. Heat cream, milk and orange rind until hot, whisk into egg mixture. Strain mixture into tin, place in baking dish with hot water to come halfway up side of tin. Bake in moderately slow oven 45-50 minutes or until set. Remove from water, cool, refrigerate overnight. Turn onto serving dish, decorate with cream and orange segments if desired. Serves 6.

Friday, November 4, 2011

Blood Orange Cheesecake

Recipe and Images by Yasmin

I had some left over cream cheese in the fridge today and I thought it would be a nice idea to make some cheesecakes for dessert. As I raided out fruit bowl for something to add flavour to the cheesecake mixture I saw and orange. I thought that was perfect to go in my cheesecake but when I cut it in half to juice it I saw that it was actually a Blood Orange. I still used it and the end result was delicious! I would recommend this recipe to anyone - it is one of my best!


Ingredients:
  • 225g Cream Cheese, softened
  • 2/3 cup caster sugar
  • 1/2 blood orange, juiced
  • 2 eggs, lightly beaten (room temperature)
  • 1 tsp. vanilla essence
  • tart cases (can be bought at local supermarket)
  • Fresh fruit, to decorate (optional)
Method:
Preheat your oven to 180C. Beat the cream cheese with the sugar. With the mixer running, slowly add the eggs, blood orange juice and vanilla. Arrange tart cases on a tray. Fill 3/4 (1-2 tblsps) of cases with the mixture. Bake for 15 minutes and leave to cool. When completely cooled (or after refridgeration), decorate with fruit (optional). Serve for afternoon or morning tea or dessert with a bowl of mixed fruit.

Monday, August 8, 2011

Lemon Cheesecake

Recipe and Photos by Yasmin

Today I felt like being distracted from my assignments and exams so I decided to bake a cheesecake, just because I could! Then I discovered halfway through that I did have an occasion; a friend was coming over! So it all worked out in the end! It was my best cheesecake yet! It is presented a little differently with the base, but it still tastes delicious; the best part about this base is that you don't need a cheesecake tin! Enjoy!


Ingredients:
For Pastry:
  • 100g chilled butter
  • 1 1/2 cups plain flour
  • Zest of half a lemon
  • 50g icing sugar
  • 1 egg, lightly beaten
  • 2 tblsp chilled water
For filling:
  • Zest of half a lemon
  • 300g cream cheese, softened
  • 2/3 cup caster sugar
  • 2 eggs, lightly beaten (room temperature)
  • 3-4 tblsp lemon juice
  • 1 tsp vanilla essence
  • fresh fruit, to decorate

Method:
For pastry: Using a food processor, pulse butter and flour until mixture resembles fine breadcrumbs. Add lemon zest and icing sugar, pulse for 1 minute. Combine the egg and water in a separate container. With motor running, slowly pour water mixture into the food processor. The mixture should stick together making dough. Remove. Roll into a ball in glad wrap. Chill for 30 minutes.

Preheat oven 220'C. Prepare an oven proof dish. On a flowered board, roll out pastry to fit the cooking dish. Blind-bake for 10-15 minutes or until lightly browned. Remove from oven and reduce temperature 180'C.

For filling: Beat zest of half a lemon, cream cheese and sugar together in a food processor. With motor running, slowly pour in the eggs, lemon juice and vanilla. Check that the consistency is smooth and not too liquidly. Pour mixture into blind baked base. Bake for 20-25 minutes until lightly brown on top. Refrigerate and decorate with berries. Serve with ice-cream.

Thursday, June 23, 2011

Coffee-soaked Gateau

Recipe from Cakes, Pastries and Breads
Images by Yasmin

This cake was served as a 53rd birthday cake for my father. He is a very happy man who loves his coffee. This cake matches his personality perfectly; strong (flavoured), handsome (appearance), hearty (dessert), and an all round (shape pun intended!) lovely man (cake). This cake I am told tastes like Tiramisu, but I wouldn't know because I have never tasted one. But I can tell you that this cake tastes delicious and has a strong coffee/liquor flavour! This post is dedicated to all those hard working fathers who need to be thanked and given a treat to commemorate their birth, which is definately something to celebrate. I love you dad! Happy Birthday!


Ingredients:
For Cake:
  • 185g butter
  • 3/4 cup caster sugar
  • 3 x 60g eggs, lighty beaten
  • 1 1/2 cups self-raising flour
For Syrup:
  • 1 cup sugar
  • 2 cups water
  • 3 tblsp strong black coffee
  • 3 tblsp rum
To decorate:
  • 1 1/2 cups cream, lightly whipped
  • cocoa, to dust


Method:
Well grease a 20cm cake tine and line the base with greased greaseproof paper. Cream the butter and sugar until light and fluffy. Gradually beat in the eggs, adding a tablespoon of the flour with the last amount. Sift in the flour, then fold in carefully. Turn the mixture into the prepared tin and level off. Bake in a moderately hot oven for 45-50 minutes or until the cake is golden brown and springs back when lightly pressed. Allow to cool in the tin for 5 minutes.

While the cake is cooking dissolve the sugar in the water and coffee in a pan over a low heat and add the rum.

Turn the cake out of the tin on to a serving plate. Pierce it all over with a skewer, then pour over some of the warm coffee syrup. Leave this to soak in, then pour over some more and continue to do this until the cake has absorbed all the syrup. Leave the cake to stand for at least 6 hours.

Spread the whipped cream all over the top and sides of the cake and decorate the top with a dusting of cocoa. Serve with coffee.

Monday, June 6, 2011

Pasties

Recipe and Images from Yasmin

This is a very simple dinner to prepare when live is hectic and there are many busy and late nights. This is a meal perfect for when you don't feel like making something that takes a while to develop a great flavour, is filling and healthy. If there are any left over puff pastry sheets to fill with the meat filling, simple sweet pasties can be prepared as well. The list of fillings possible for this pastry design is endless, so have a go at mixing your favourite sweet and savoury flavours to produce something simply delicious. If serving this meal as a dinner, be sure to serve with a beautiful garden salad. I apologise in advance for this inartistic photo of the meal, we were in a hurry to eat and I couldn't prepare a decent setting for the meal. It is eaten so quickly it is hard to capture it on camera!!!

(cooked savoury pastie)

Ingredients:
For Savoury:
  • 1-2 carrot
  • 1-2 zucchini
  • 1 sweet potato
  • 1 potato
  • 1 cup green beans
  • 1 cup corn kernells
  • salt and pepper, to taste
  • 300-500g minced beef 
For Sweet:
  •  2 -3 dessert spoons of jam
  • 1 apple, thinly sliced and cored
  • 1 cup dried fruit (of choice)
  • 1/2 cup coconut 
 (Uncooked Sweet Pastie)

Method:
Take frozen puff pastry sheets out of freezer and separate, allowing to defrost on the bench.

While pastry is defrosting, prepare savoury filling. Into a large bowl, grate carrot, zucchini, sweet potato, potato, beans and corn. Add partially defrosted minced meat. Add salt and pepper to taste. Using bare hands, thoroughly combine the savoury filling. 

Using a sharp knife, divide the mostly defrosted pastry diagonally, to create two triangles. Place a small handful of the uncooked mixture in one end of a triangle piece of pastry. Mold this to fit into the triangle shape, leaving about 1-2cm room around the edges to allow room to fold the pastry. Grab the other corner of the triangle and drag it over the filling to match the triangle shape, this is symmetrical. Press down on the folded pastry to seal the triangle shape pastie. Fold over the edges of the triangle and press again to secure (this should make sure that the pastie won't open and the contents spill). Lastly, twist the ends of the triangle, as it is just excess pastry.

Continue until all filling is used. As each pastie is made, place it on an oven tray lined with non-stick baking paper. Cook for 20-30 minutes on 180'C fan-forced.

If there is leftover pastry either cut it into triangles, as done for the savoury pasties, or leave it as a square to then fold into a rectangle (as shown in picture). Prepare a sweet filling. Smooth jam over pastry. Cover with coconut, thinly sliced apple, currants, sultanas, dried apricots and/or dates. Fold symetrically, using the same method as before, whether it is a triangle or rectangle, except, for the rectangle, cut a few slits in the sides (as shown in the photo).

Cook for 20-30 minutes at 180'C fan-forced.

Sunday, May 29, 2011

Lemon Meringue Pie

Recipe and images by Yasmin

This is a family recipe that has been well shared among friends as well. It is truly delicious dessert for any gathering that I guarantee will stir a good conversation. This recipe requires minimal fuss and ingredients but still produces fantastic results. It really does.. Tickle Your Taste buds! For even more flavour in this dessert add one can of passion fruit pulp and syrup or two passion fruit. This gives an excellent kick to the citrus flavours.
NOTE: For future cooking reference, this pastry can be used for any pastry desserts - just remove the lemon zest. It produces a very steady dough for molding on the dish and extra decorations on the top of pies.


Ingredients:
Pastry:
·         100g chilled butter
·         1 1/2 cups plain flour
·         1/2 lemon of grated zest
·         50g icing sugar
·         1 egg, lightly beaten
·         2 tblsp chilled water

Filling:
·         tin of sweetened condensed milk
·         2 - 3 egg yolks
·         juice of to lemons

Meringue:
·         3 egg whites, at room temperature
·         1/2 cup Castor sugar


Method:
Using a food processor, pulse butter and flour until mixture resembles fine breadcrumbs. Add lemon zest and icing sugar, pulse for 1 minute. Combine the egg and water in a separate container. With motor running, slowly pour water mixture into the food processor. The mixture should stick together making dough. Remove. Roll into a ball in glad wrap. Chill for 30 minutes. Preheat oven 220'C. Prepare an oven proof dish. On a flowered board, roll out pastry to fit the cooking dish. Blind-bake for 10-15 minutes or until lightly browned. Remove from oven and reduce temperature 180'C. For filling, combine ingredients into a bowl. Then pour into the partially cooked pastry base. Cook for approximately 15 minutes. For meringue, whisk egg whites until soft peaks form. Slowly add Castor sugar while beating, until stiff and glossy.

Spoon meringue over the top of the cooked filling. Bake for another 10-15 minutes or until the meringue is lightly browned. Serve warm or cold with whipped cream and ice cream.

Friday, May 20, 2011

Microwave Caramel Self Sauce Pudding

Recipe from Super Food Ideas
Photo by Yasmin

I'm sorry that I have not been able to post any of the recipes I have listed in the 'Soon to come' column. I have had this recipe and photos ready to post since Mother's Day; however, have not had the time to post it. My mother enjoyed her first of two desserts I prepared for her, the second, Lemon Meringue Pie, will be posted shortly. I have just been sooo busy with one million and one things to do, I'm sure you all know the feeling. If you are in that stressed and hectic situation, I recommend that you be naughty and eat some of this delicious comfort food. This self-sauce pudding takes less that 17 minutes to prepare and cook, and it is absolutely fabulous! It can be made with or without the nuts, I prefer without. This pudding is perfect for a truely naughty afternoon tea or dessert, especially in the now cooler months when you need that bit of warmth. I'm telling you now, this hits the spot. I also appologise for the unprofessional photograph of this pudding, I was craving food and comfort, so I just took one quick photo, which wasn't very neat.


Ingredients:
  • 1 cup self raising flour
  • 1 1/4 cups firmly packed brown sugar
  • 60g butter, melted
  • 1/2 cup milk
  • 1 egg
  • 1/2 cup chopped pecan nuts (optional)
  • 1 cup boiling water
  • icing sugar and ice cream, to serve
Varitations: Replace pecans with chopped hazelnuts, almonds or macadamia nuts.

Method:
Grease a 6cm deep, 6 cup capacity, heatproof, microwave safe dish. Combine flour and 1/2 cup sugar in bowl. Make a well in the centre. Add butter, milk and egg. Whisk to combine. Stir in pecans. Spoon mixture into prepared dish. Smooth top. Combine boiling water and remaining sugar in a heatproof jug. Stir until sugar has dissolved. Pour mixture over the back of a large metal spoon to evenly cover pudding batter.

Place dish on a microwave safe rack or upturned dinner plate. Cook, uncovered, on Medium (50%), for 9-10 minutes or until the pudding comes out clean. Carefully remove from microwave. Stand for 1 minute. Dust with icing sugar. Serve with ice cream.

Thursday, April 28, 2011

Apple Pie

Recipe and Photos by Yasmin


This is a classic dish that everyone should make at some point in their life, whether it is with your Grandma or your Grandchildren. This dessert, for me, isn't as much about the soft texture of the apples complimented by the sweet flavour of cinnamon and sugar, it is about tradition. Rain or shine, hot or freezing, without fail, I will make this dessert when my Grandma comes and visits from Melbourne. It is a tradition that strengthens our love and makes each other happy. My Grandma is the woman who taught me how to make this dessert by letting me stand by her side and peel the apples and roll the pastry. She is a major factor that made me who I am today and helped develop my love of cooking. Although I am older and more experienced in the cooking department, and my Grandma has become less capable, our tradition and bond is tighter than ever. Nowadays, when she visits (as she is at the moment) I am the one who makes this beautiful dessert for her and she is the one to judge if it is made with enough Grandma love. I hope everyone enjoys making Apple Pie as much as I do, and enjoys sharing this dessert all year round, but especially at Easter (as shown through the bunny on the table cloth!) with you much loved family.


Ingredients:
Pie:
  • 20 apples, peeled, cored and chopped
  • 1 cup water
  • 1/3 cup milk, to brush
  • 2-4 tsp sugar, to dust
  • 2-4 tsp cinnamon, to dust
  • short crust pastry (home made preferably - see recipe below)
Pastry:
  • 100g chilled butter
  • 1 1/2 cups plain flour
  • 50g icing sugar
  • 1 egg, lightly beaten
  • 2-3 tblsp chilled water

Method:
For Pastry; using food processor, pulse butter and flour until mixture resembles fine breadcrumbs. Add icing sugar and pulse for 1 minute. Combine the egg and water in a separate container. With the motor running, slowly pour water mixture into the food processor. The mixture should stick together making dough, if not add more flour until it comes together as a dough. Remove and cover in nonstick wrap. Form it into a ball shape. Chill for at least 30 minutes.

For Filling; stew apples by placing them in a large pot. Fill just a little bit of the bottom of the pot with water, to start the softening of the apples when boiled. Boil the apples and then turn down the heat and let them simmer. Constantly check the apples to see if they are soft. Once softened remove from heat and allow to cool.

Remove pastry and place the ball of dough on a floured mat. Take 3/4 of the dough to be the base and roll out in a circular shape until wide enough to fit the pie dish and go over the edges. Spray the pie dish with cooking canola spray and lay the rolled pastry on it. Add the stewed apples but do not overfill the dish. Using the 1/4 of dough left roll out in the same way as the base to use as the top of the pie (it is always better for the base to be thicker than the top). You can leave the top as a whole circle to cover the pie or you can cut the pastry into strips and create a laced top pie. If there is extra pastry hanging over the edge of the pie then cut it off with a sharp knife and use it to create patterns on top of the pie. For assistance in the decorations, use shape cutters. When placing the top pastry to the pie, brush milk on the edges to help the two pastry sheets to stick together. Then, using a fork, press the fork prongs around the edges of the pie to make sure the two sheets are stuck together and to complete the pie's appearance (as shown in the photo below). To finish, brush the top of the pie with milk and then dust with sugar and cinnamon (this allows the sugar and cinnamon to stick to the pie top).


Bake in the oven at 160'C fan forced for 40-45 minutes. When golden brown on top, remove and allow to cool a little before serving. Serve with cream and/or ice-cream and a dusting of cinnamon over everything (optional).

Monday, April 25, 2011

Easter Cake

Recipe and photos by Yasmin

I understand completely that this is being posted a few days after Easter, but this is when I had time to make it. Also, I understand that I am going completely against my rule that this blog would contain no traces of chocolate whatsoever, however, Easter isn't really Easter without some chocolate. So here is my main Easter recipe that is a little bit naughty but a whole lot of fun. I guarantee that you will enjoy making and serving this dessert because it is full of life and the joy of Easter.


Ingredients:
Coffee cake batter:
  • 2 tblsp margarine or butter
  • 1 cup self raising flour
  • 1 cup sugar
  • 1/2 cup milk
  • 2 eggs
  • 1/2 tsp vanilla flavouring
  • 2-3 tsp instant coffee dissolved in 3 tblsp boiled water
Decorations:
  • chocolate icing
  • melted cooking chocolate
  • sugar coated mini chocolate eggs
  • cellophane and miniature chicken

Method:
For Coffee Cake; Grease a fluted cake tin. Heat oven 180'C fan forced. Melt butter in a medium sized bowl. Add all other ingredients and beat until smooth. Put in prepared cake tin. Bake for 25-30 minutes. Once cooked turn out onto a wire rack. Prepare chocolate icing while cake is cooling.

For Chocolate icing see Icing and Sauces Page on blog.
Once cake is cooled, ice.

Leave the cake to set. Once set, arrange the cellophane in the middle of the cake to fill majority of the hole. Cover cellophane with sugar coated chocolate eggs. This arrangement of decorations should look like eggs in a nest.

Melt 2-3 tblsp cooking chocolate or cooking choc chips in a plastic zip lock bag (be careful not to burn the chocolate - melt on a low heat). Using scissors, snip a pin prick sized hole at one end of the zip lock bag to create a mess free piping bag. Pipe long lines from left to right until the cake is covered with chocolate lines (as seen in the photo below).

For the finishing touches, place a miniature yellow chicken in the nest near the eggs - giving the Easter and mother hen effect.

Serve.

Saturday, February 19, 2011

Sticky Toffee Pudding

Recipe from I Love Sugar
Images by Yasmin

(serves 6-8)
I have always loved caramel flavoured treats and desserts, and recently at a friends house I was reminded of one of my favourites; Sticky Date Pudding. This dessert was so delicious that I promised myself that I would make it again soon. So when the occassion arose, I jumped at the chance to offer this twist to a classic; Sticky Toffee Pudding. Although it almost turned out as a disaster because I forgot to fold in the flour, this dessert will serve everybody's cravings for sweet and scrumptious. I served this cake as a welcome home dessert for my sister, Alana, who has been in Japan for the past three months and is homesick for my cooking! What separates this dessert from the original is that it has more dried fruit, not as many basic cake ingredients, and a new and improved sauce, Sticky Toffee Sauce. I loved this dessert and I know you will too! Did you know that dates are old fruits from the holy land that grow on Date Palms?

Ingredients:
Pudding:
  • 75g sultanas
  • 150g stoned dates, chopped
  • 1 tsp bi-carb soda
  • 25g butter
  • 200g soft light brown sugar
  • 2 eggs
  • 200g SR flour
Sticky Toffee Sauce:
  • 25g butter
  • 17ml double cream
  • 200g soft light brown sugar

Method:
Preheat oven to 180'C fan-forced. Grease a 20cm round cake tin.

To make pudding, put the sultanas, dates and bi-carb soda into a heatproof bowl. Cover with boiling water and leave to soak. Put the butter into a separate bowl, add the sugar and mix well. Beat in the eggs, then fold in the flour. Drain the soaked fruit, add to the bowl and mix.

Spoon the mixture evenly into the prepared cake tin. Bake for 25-35 minutes, or until skewer inserted comes out clean. Remove from oven and turn out onto wired racks to cool if not serving immediately.

About five minutes before the end of the cooking time, make the sauce. Melt the butter in a saucepan over a medium heat. Stir in the cream and sugar and bring to the boil, stirring constantly. Reduce the heat and simmer for 5 minutes.

Turn out the pudding onto a serving plate and either pour over the sauce or place in a jug and allow guests to serve themselves. Serve with whipped cream or unwhiped cream drizzled on or ice-cream or custard (optional).

Saturday, February 12, 2011

Orange and Lime Cheesecake

Recipe from Favourite Muffins, Biscuits, Cakes and Slices
Image by Yasmin

(Serves 8)
I am very proud of my efforts with this cheesecake because it is the first cheesecake I have ever made. During  the process I faced a few speed bumps, but all turned out well in the end. So you don't worry while baking this cheesecake I shall tell you my hicups and how to over come them. Firstly, when you press the biscuit base into the removable base make sure that it climbs a little up the sides of the tin - otherwise once you have poured in the cheesecake mixture it will start leeking out the sides!!! If this does begin to happen - as it did with me - place the tin on to a baking tray and then into the oven. In this way it will have something pressing on the base so the leeking stops. Secondly, don't worry if the mixture seems really runny once everything has been added, if you are concerned add a little bit more cream cheese, condensed milk and cream. Once it has cooked it will set and become firm. Thirdly, after folding in the whipped cream the cheesecake mixture seems very lumpy, when it doesn't appear lumpy in the photo provided. Once again don't freak out, it is meant to look like that at this stage. While it is cooking the cream seems to melt, spread out and blend in with the rest of the mixture. Lastly, if the cheesecake starts to get dark spots on the top where it has overcooked, and the rest is not yet firm, simply rotate the tin in the oven and try to forget about it!!! Keep in mind that you can't get it perfect first time everytime, even if it doesn't look exactly as it does in the picture, remember it will still taste fantastic all the same! Good Luck!


Ingredients:
For Base:
  • 1 cup plain sweet biscuits, crushed
  • 1/3 cup butter, melted
For Filling:
  • 3/4 cup cream cheese, softened
  • 2 tblsp brown sugar
  • 1 1/2 tsp finely grated orange zest
  • 1 1/2 tsp finely grated lime zest
  • 3 tsps orange juice
  • 3 tsps lime juice
  • 1 egg, lightly beaten
  • 1/2 cup sweetened condensed milk
  • 2 tblsp double cream, whipped

  • desicated coconut, toasted, to decorate
  • whipped cream, to serve 

Method:
For base, place biscuits and butter in a bowl and mix to combine. Press the bisuit mixture over the base and up the sides of the well-greased 23cm flan tin with a removable base. Bake for 5 - 8 minutes at 180'C fan-forced, then cool.

For filling, place the cream cheese, sugar, orange and lime zests and juices in a bowl and beat until creamy (may start to get lumpy here due to cream cheese). Beat in the egg, then mix in the condensed milk and fold in the cream (large lumps will form). Pour the filling into the prepared biscuit case and bake for 25 - 30 minutes or unti ljust firm. Turn the oven off and cool the cheesecake in the oven with the door ajar. Chill before serving., Serve decorated with the toasted coconut and cream.

Saturday, February 5, 2011

Coconut Cake with Passionfruit Sauce

Recipe from Erica
Images by Yasmin

This is a beautiful little tea cake to share among friends. I first ate this cake at a family friends home for morning tea a few years ago and have been baking it ever since. It is just so simple and sweet. I love the different textures of the coconut, passionfruit pulp and soft sponge cake, all combining perfectly in your mouth as you take the first bite. The mixture of textures, flavours and the hot sauce, balances this cake perfectly.


Ingredients:
Cake:
  • 170g raw sugar
  • 120g butter
  • 150g SR flour
  • 50g desiccated coconut
  • 1 egg
  • 60g milk
  • 60g coconut milk
  • whipped cream, to serve (optional)
Syrup:
  • 170g tin passionfruit pulp
  • 50g water
  • 60g sugar

Method:
Preheat oven 180'C fan forced. Prepare square cake tin. Place sugar in food processor. Pulverise. In seperate bowl, melt butter. Add to sugar. Add remaining ingredients. Mix well. Pour into prepared tin. bake for 30 minutes or until golden brown on top. Cool for 10 minutes in tin. Put on rack to cool completely. For Syrup recipe visit the Icings and Sauces Page on this blog. Serve with cream and syrup.

Jolly Cake

Recipe from Cake Bible
Images by Yasmin

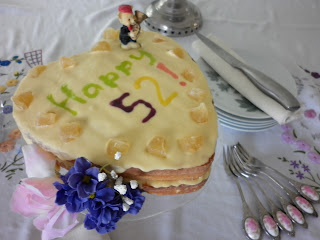
This cake is very festive. It will suit all special occasions; birthdays, parties, Easter and especially Valentines Day. With knowledge of this upcoming event, and my Mum's birthday, I prepared  this cake in the shape of a love heart and decorated it accordingly. Depending on this situation depends on the decorations and design, be as creative as possible! Personally, I love layered cakes and sweet flavours. In this cake the filling is not the usual cream and strawberries combination, but instead is honey and lemon icing - a beautiful combination. This 'jolly' cake is best shared in the happy accompaniment of friends and family, in order to give life to it's name.


Ingredients:
Base:
  • 175g butter
  • 175g brown sugar
  • grated zest of 1 lemon
  • 3 eggs, beaten
  • 175g SR flour, sifted
  • 1/3 cup whisky
Filling:
  • 50g butter
  • 175g icing sugar
  • 1 tblsp lemon juice
  • 2 tblsp thick honey (alternatively you can use golden syrup)

Method:
Preheat oven 190'C fan forced. Prepare two cake shallow cake tins for layering. Cream butter, sugar, lemon zest. Gradually beat in eggs, keeping mixture stiff. Fold in half the sifted flour. Add whisky and the remaining flour. Pour evenly into the 2 prepared tins. Bake for 20 - 25 minutes. Allow to cool on rack.

For lemon butter cream filling, beat all ingredients into a bowl. Sandwich cakes together with half the filling. Spread left over filling on top of the cake. Decorate accordingly. Serve.

Friday, January 21, 2011

Whole Orange Cake

Recipe from Super Food Ideas
Images by Renata and Yasmin

(serves 12)

The first time this cake was made in our household it was prepared by my mother. I watched intricately as she showed me the important steps preparing this cake; you must boil the oranges whole, with skin, twice. This is done to remove the bitterness of the orange and softening the peel and pitch; leaving a sweet taste for the cake. I have now successfully, as my friends told me, made a replica of this cake - following my mum's example. Everybody enjoyed devouring this cake at afternoon tea along with a wide collection of my favourite recipes; Gooey Caramel Muffins, Rum Balls (which will sadly not feature in this blog as it contains chocolate) and Scones (an old family recipe). Everybody always has a great time when surrounded by friends, family and great food!


Ingredients:
  • 2 small (400g) oranges
  • 125g butter, melted
  • 1 cup milk
  • 3 eggs, lightly beaten
  • 1 1/2 cups SR flour, sifted
  • 1 cup caster sugar
  • 1/2 cup almond meal (ground almonds)
  • Orange zest to decorate
Orange Icing:
  • 1 1/2 cups pure icing sugar, sifted
  • 10g butter
  • 2 tblsp orange juice

Method:
Preheat oven to 160'C fan-forced. Grease a 24cm (base) fluted ring pan (as seen below).


Place oranges in a saucepan. Cover with cold water. Bring to boil. Drain. Cover with cold water. Return to the boil. Drain. Set aside until cool enough to handle.

Roughly chop oranges in quarters. Remove and discard seeds. Process until smooth. Transfer to a bowl. Stir  in butter, milk, eggs, flour, sugar and almond meal until combined. Pour mixture into prepared pan.

Bake for 50 - 60 minutes or until a skewer inserted in cake comes clean. Stand cake in pan for 10 minutes. Use a knife to lightly cut around the edge and middle to separate cake from edges of the tin. Turn onto wire rack and cool.

To make icing: Place sugar, butter and orange juice in a heatproof bowl  over pan of simmering water (bain marie). Stir for 5 minutes or until smooth. Set aside for 5 minutes or until slightly thickened. Pour over cake. Top with orange zest. Stand for 15 minutes or until set.

Sunday, January 2, 2011

Cheesecake (lime) Tarts

(fills roughly 12-18)

Recipe from Ruth Gilmore and Yasmin
The original recipe is below for this delicious cheescake; however, it is very simple to modify to suit the flavour wanted. As I love citrus flavours, I replaced 1 tsp of vanilla essence with the juice and rind of 2 limes. This can also be flavoured with the juice and rind of any citrus fruit. Be sure though not to make the mixture too runny. Another variation to the original recipe is serving the cheesecake in larger tart cases with fruit on top, serving it as a dessert with ice-cream and dusting it with icing sugar and lime zest. You can decorate and serve it however you please; be creative.


Ingredients:
  • 225g Cream Cheese, softened
  • 2/3 cup caster sugar
  • 2 eggs, lightly beaten (room temperature)
  • 1 tsp. vanilla essence
  • tart cases (can be bought at local supermarket)
  • Fresh fruit, to decorate (optional)
Method:
Preheat your oven to 180C. Beat the cream cheese with the sugar. With the mixer running, slowly add the eggs and vanilla. Arrange tart cases on a tray. Fill 3/4 (1-2 tblsps) of cases with the mixture. Bake for 15 minutes and leave to cool. When completely cooled (or after refridgeration), decorate with fruit (optional). Serve for afternoon or morning tea with a bowl of mixed fruit.

Blueberry Custard Loaf

Recipe from Coles
Image by Melita Baker

The first time I took a bit of this mouth watering dessert, it was Christmas. While we still had the traditional Christmas pudding this second option immediately became a favourite among friends and family. My cousin prepared this dessert and simply explained it as a blueberry ice cream loaf. What forms the ice cream effect is the frozen cream and custard, a beautiful blend. Personally, custard is one of the many things that I do not like, but I was encouraged to try this dessert and I strongly recommend everybody try this dessert. The custard and cream mix and set well, complementing each other perfectly. As a fussy eater, I can honestly say that I could not specifically taste the custard - the flavour of the blueberries and cream is stronger. NOTE: For greater ease in preparation time, this dessert can be made up to one week in advance.


Ingredients:
  • 250g Unibic Sponge Finger Savoiardi Biscuits
  • 2 tblsp Orange Juice
  • 500g Premium Style Custard
  • 300ml Thickened Cream, whipped
  • 2 x 125g punnets blueberries

Method:
Line an 11c x 24cm (base measurement) loaf pan with baking paper, allowing the long edges to overhang by 5cm. Arrange half the sponge fingers, crossways, over base of prepared pan, trimming edges so they fit snugly. Drizzle with orange juice. Gently combine custard and cream. Pour half the custard mixture over the sponge biscuits. Top with another layer of biscuits. Scatter over half the blueberries and pour over remaining custard mixture. Scatter over remaining blueberries. Place in freezer overnight to set. Remove from freezer 10 mins before serving. Use baking paper to lift custard loaf out of pan. Cut into slices and serve.

Monday, December 20, 2010

Incredible Pie

Recipe from Yasmin
Image by Cynthia Graubart

This is my most questioned and popular dessert or dish for afternoon tea. Everybody who has tried it has asked for the recipe, so I'm posting it on my blog for all to share. This is a moist dessert that shouldn't be overcooked and mustn't be undercooked or it will be sloppy and wet. To cook it to perfection you must let it brown evenly on top. Also, the dessert has a tendency to rise really tall in the centre, so leave plenty of room in the oven. Do not fret about the centre because it is just filled with hot air, once it has sat for a while on the bench it will disperse back to its original state. Serve this dessert with whipped cream either cold or hot - preferably cold, among friends or family.


Ingredients:
  • 1/2 cup flour
  • 1/2 cup butter
  • 4 eggs
  • 1 cup sugar
  • 1 cup coconut
  • 2 cups milk
  • 1 tsp vanilla flavouring
  • whipped cream, to serve (optional)

Method:
Beat all ingredients together in a large bowl. Bake in a pie dish at 190'C fan-forced for 45 minutes. Serve with whipped cream (optional).

Friday, December 17, 2010

Raspberry Swirl Ice-Cream Cake

Recipe and Image from Coles

(Serves 8-10)

A beautiful and delicious dessert that hits the spot! Guaranteed to please every guest!


Ingredients:
  • 2 cups cream
  • 345ml condensed milk
  • 1/3 cup frozen mixed berries, thawed, pureed
  • 150g raspberries
Method:
Line base and sides of a 20cm round cake pan with plastic wrap and non-stick baking paper. Using an electric beater, beat together cream and condensed milk until soft peaks form. Pour into prepared pan. Dollop berry puree over cream. Gently swirl over top with metal skewer. Cover with plastic wrap and freeze overnight. Remove from freezer and gently ease cake out of pan. Place on serving plate. Scatter over raspberries. Sit at room temperature for 5 minutes before cutting into wedges to serve.

Lemon Tart

Recipe and 1st Image from Coles
2nd Image by Yasmin

(serves 8)

This is a lemony and tasty dessert that will please many guests. As this recipe contains lemons it is growing to become one of my personal favourites. I would recommend this recipe for anyone who wants to make a reasonably quick and simple dessert to share.


(Lemon Tart)


(Lime Tart)
 
Ingredients:
  • 1 sheet frozen shortcrust pastry, thawed
  • 4 eggs
  • 1/2 cup caster sugar
  • 1/2 cup lemon juice
  • finely grated lemon rind
  • 1/2 cup cream
  • icing sugar, for dusting
  • thick cream, to serve
Method:
Preheat oven to 160'C fan-forced. Grease a 22cm pie dish. Line prepared dish with pastry. Trim edges, using scraps to patch any short sides. Chill for 15 minutes. Line pastry with baking paper and fill with rice or pastry weights. Blind Bake for 15 minutes. Remove paper or weights and bake for another 5 minutes. Cool in pan. Mix together eggs, sugar, juice, rice and cream. Pour into prepared tart shell. Bake for 30 - 35 minutes, until just set, but still wobbly. Cool in pan. Dust tart with icing sugar. Serve in wedges topped with thick cream.